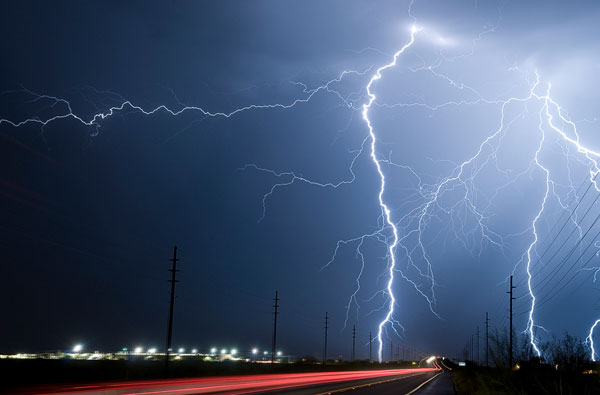
How To Photograph the Perfect Lightning Photo
Lightning is one of nature’s most amazing, terrifying and beautiful phenomena, and also one of the world’s hardest subjects to photograph. It is hard because lightning appears and disappears rapidly, because the lighting is difficult and because it’s hard to get a good photograph without risking getting your equipment wet. Planning in advance and following a few basic tips can ensure that your images capture the power and glory of the next electrical storm you try to photograph.
Plan ahead
Consider your location in advance. Anyone can take a picture of lightning, but what really sets a great image of lightning apart is the full composition. Make a list of beautiful landscape locations and plan to take pictures of the lightning from those locations, so that the landscape illuminated by the electrical storm is just as impressive as the lightning activity.
Try for variety
Too often photographers who capture images of lightning only do so at night, when some of the most amazing images are taken while it is still light. Consider the possibilities of capturing lightning at dawn, during the sunset, or at other times of the day when the sky coloring, and light of exposure are interesting and add dimension to the photograph. Also, remember that there are three types of lightning: cloud to ground, cloud to cloud, and intracloud electrical impulse. Try to capture images that demonstrate all three types of electrical activity.

Photo by Larry Reeves
Set up and shoot ahead of the storm
Rain fall will naturally soften the image, and endanger your equipment. Images that are taken as the storm approaches, and before rain begins to fall, are sharper and more intense.
Step 4: Setting your exposure autofocus does not work well for capturing images of lightning, because it will not get sharp enough. Though some photographers set their lens to infinity when shooting, it is more effective to find, and focus on, a really distant light. This will result in really sharp lines around the bolts that define them and give them prominence in the image.
Set your shutter speed for your purpose
Using the fastest shutter speed possible will prevent over exposure and ensure the sharpest image, but in some cases this will not capture the most dynamic image. If there is a high frequency to the lightning bolt pattern, it may be beneficial to leave the shutter open longer in order to capture multiple lightning bolts in a single image.
Frame the image
Make sure that all the framing elements are there before you begin snapping images. Try to frame your image well, but don’t be afraid to click now and crop later. If the elements for a great framing are in place when you take the picture, you can crop it to alter the exact position and distance of the image after you get home.
Perfect your timing
Remember that timing is the most important element, the lightening bolt is not going to wait for you to get everything perfect. As soon as you see the first hint of light from a developing bolt, take the photograph. Lightening bolts often last only seconds, and any hesitation may mean a photograph of the blank sky rather than nature’s fireworks.


I’ve had the best lightning results using these settings: 20 seconds, f8, and ISO100, with a 35-90mm lens. Storms usually have a lightning core, or an area of the storm that has more ground strikes. They also usually have a timing of between 30 seconds and a minute between strikes. But even with that, it’s not hard to shoot 40 exposures and only get 1 or 2 good strikes in frame. You also don’t have to be very close, which I’ve learned the hard way. My best shot came from a cotton files in Spur, TX, where I was so close my hair stood on end. I was the tallest object around, aside from my metal tripod… Not smart but I got the shot. http://www.flickr.com/photos/imacmike/6821725190/
Helpful advice. Thanks